Defeating Malware Counterintelligence Guide: Building a Cheap Local Windows/Linux Malware Test Environment
Summary
Every enterprise and/or security analyst should have access to a local malware laboratory where malicious code can be dissected, detonated, and observed without fear of compromising business resources or violating corporate policy. The following is a detailed narrative of the process involved in building a useful and scalable local environment for the analysis of malicious code destined for Linux and Windows.
Introduction
Rewind a decade when malicious code operations were relatively straightforward. Bots like Rbot, Agobot, and SDbot used Internet Relay Chat (IRC) for command and control (C2), and malware traffic analysis meant infiltrating an IRC channel and capturing corresponding bot herder issued commands for comparatively easy campaign attribution. Those nostalgic days are gone.
In 2016 the information security community is confronting malicious code that is built by talented individuals and teams incentivized to avoid detection within hosts and networks. Runtime analysis of malware in virtual environments is often insufficient because built-in detection logic of a virtual environment often leads to a halt in the malware’s execution or a different set of routines (creating disinformation headaches). A history of malware families like Win32/Sirefef detecting or escaping publicly available virtual environments — local: e.g., VMware, Virtual PC, VirtualBox, Xen Project, QEMU, and online: e.g., Joe Sandbox, GFI, Anubis — implies that an improved malware analysis environment configuration is needed for improved operational security (OPSEC) and to address the widest possible malware contingencies.
The answer to the evolving challenges of malware situational awareness is “bare metal” — physical computing resources which are different from virtualized computing resources — and it alleviates the majority of pain points associated with virtual malware analysis. Best of all, “bare metal” is a complete solution that saves information security practitioners the most valuable of all resources: time. The following environmental build tutorial is designed for aspiring, entry-level, and veteran operational defenders that need a comprehensive malware workspace to increase knowledge and professional capabilities.
Hardware Requirements
This guide will attempt to balance component prices and functionality so that the reader can accomplish due diligence for his/her employer and accomplish savings for a personal bank account. Regardless of desired outcome, we will illustrate various ROI scenarios.
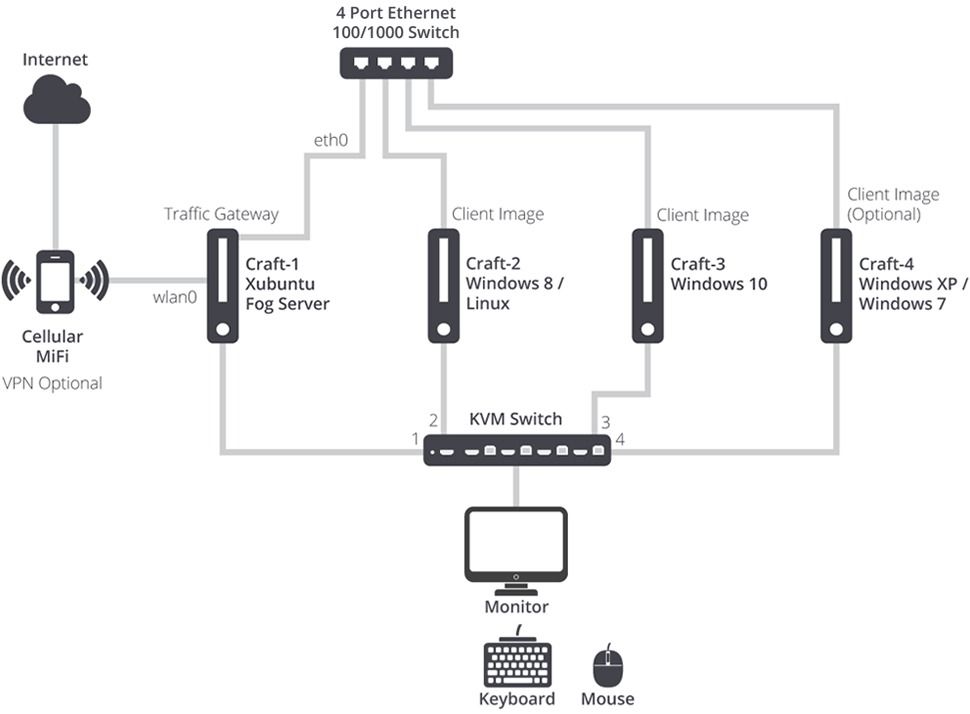
To begin, three computers (two will work if you want to multi-boot operating systems on one PC) are needed. Craigslist always advertises listings for cheap, used computers that will help keep the price down. However, longevity issues and the need to wipe the hard drives before use may not be worth the trouble. In the first example, Dell Inspiron Small Desktops (recently discontinued) are used because their small form factor saves desk (or floor) space, they have plenty of hard drive availability, and they include an ethernet and WiFi interface for maximum connectivity options. Dell occasionally offers sales during which the price could drop to $399 USD for similar systems.
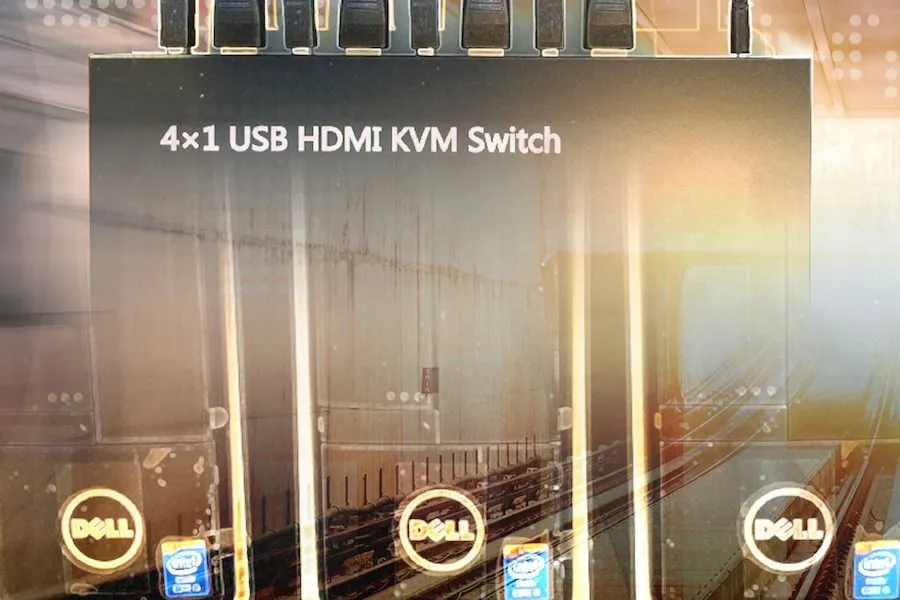
Next, the PCs need to be physically connected. A four or five port ethernet switch and ethernet cables should cost no more than $40. To avoid wasting multiple monitor space, a KVM switch is used to connect all of the desktops to one monitor. A pricier KVM will save time when switching between PCs, and supporting HDMI video is easier on the eyes (assuming a decent monitor resolution is available). We use the 4×1 USB HDMI KVM Switch, which is great value at $85, and the cable management is efficient, with one USB cable and one HDMI cable per PC.
The Basics: Craft-1 Gateway
After connecting the PCs to an ethernet switch and a KVM switch/monitor, we start by installing the necessary operating systems on each host, in this configuration “craft-1,” “craft-2,” and “craft-3” respectively. Craft-1 is our network gateway, supplying Internet connectivity to the other two (or more) hosts. The requirement for this open source imaging solution — Fog — is Ubuntu Linux. Thus Ubuntu is installed on craft-1 so that it will also function as our imaging server.
The release of Ubuntu 10.10 introduced the Unity desktop environment, which included additional Gnome visual elements that slowed older PCs due to resource constraints while providing little functional value. Fortunately, Xubuntu is a superb alternative — the user achieves Debian power with a functional, but minimalist, Xcfe desktop environment. The latest long-term support (LTS) version of Ubuntu is 14.04, which is what we need to install — Xubuntu 14.04.
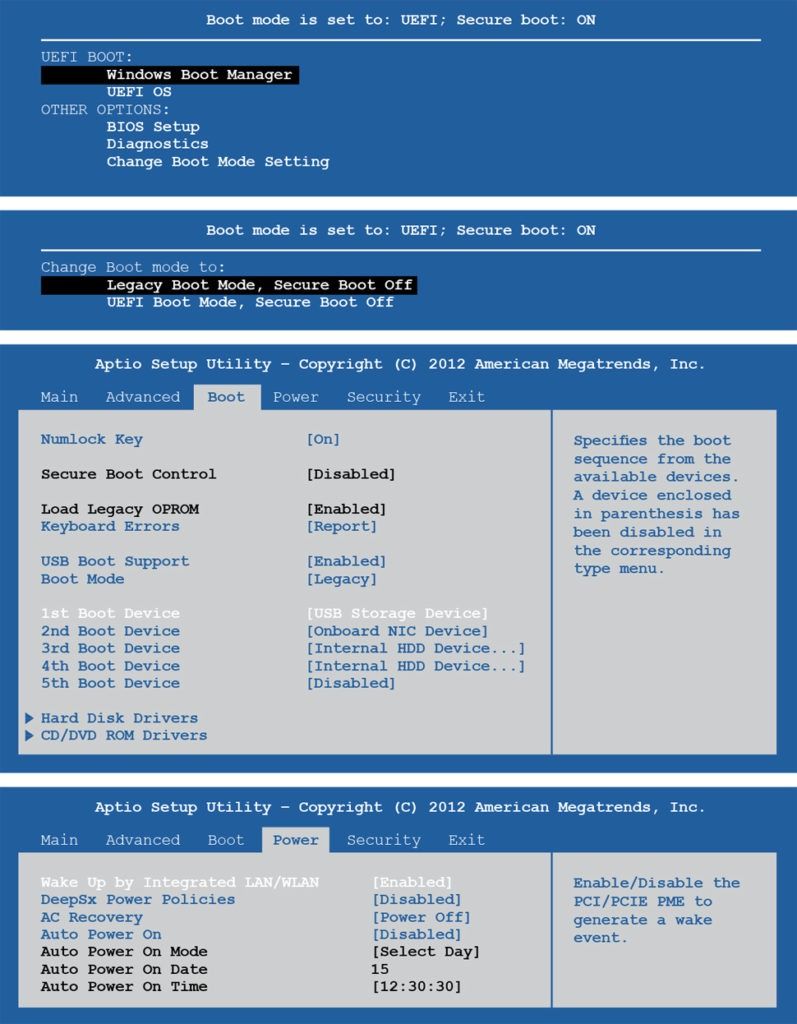
To install Xubuntu, it is necessary to download the relevant ISO file (32 bit or 64 bit) and burn it to a USB “thumb” drive. Depending on your operating system, you may need to download a third-party program to facilitate the USB boot drive creation. To boot your PC from a USB drive, you will likely need to enter the BIOS by pressing the F2 key immediately after powering on the computer, which will interrupt the boot sequence. Depending on the BIOS manufacturer and version, you may need to turn off “UEFI Secure Boot” to properly edit the boot settings in Windows Boot Manager. “USB” should be the first boot priority, followed by the hard drive (“Internal HDD Device”). On the second and third PCs, Preboot Execution Environment (PXE) needs to be located above HDD in the boot order to enable booting from the network (if PXE is not a boot option, different PCs that support PXE will be necessary); the “wake on LAN” option also needs to be enabled from the BIOS menu, which will be important later for imaging.
Once the PC is booting from USB, we follow the prompts and either dual boot with the existing Windows OS by resizing the Windows partition to make room for a new partition, or delete the existing large partition (don’t delete the small boot partition) and create a new partition and install Xubuntu 14.04.
Networking
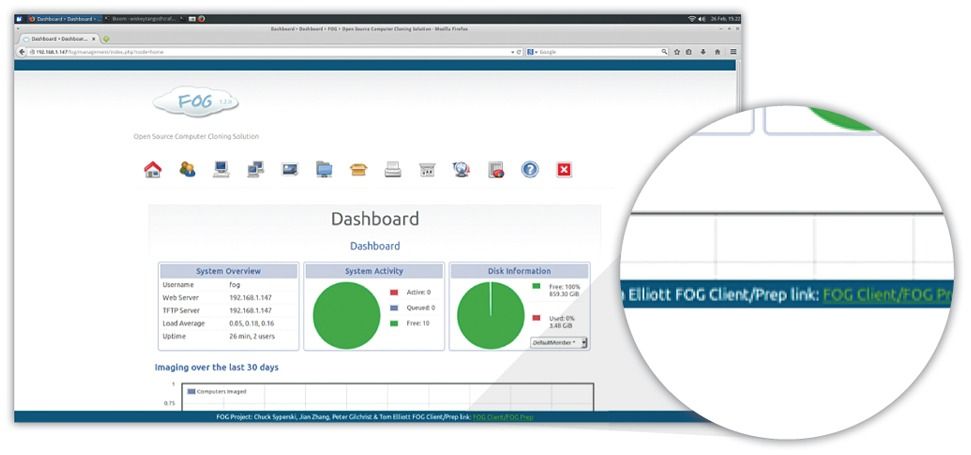
The next step is to install Fog, an open source imaging solution. The installation script is less likely to encounter issues if you refrain from updating (_ sudo apt-get update_ ) Xubuntu post-installation. Once Fog successfully installs you will need to configure settings via the URI —
Now that Fog is installed on craft-1, we need to link interfaces (in our case we link the ethernet interface (eth0) and the wireless interface (wlan0)) for craft-1 to act as the default gateway for all traffic initiated by craft-2 and craft-3. On Xubuntu 14.04 this task can be accomplished through the routing table, which obviates the need to create a new logical interface via Ubuntu’s “bridge utilities” (the packages is known as bridge-utils). Use Vi or Joe to edit /etc/sysctl.conf and uncomment the row containing net.ipv4.ip_forward = 1. After enabling IP forwarding, either an iptables static route is added or Masquerade is allowed to handle the Dynamic Host Configuration Protocol (DHCP) negotiation. Ubuntu Official Documentation offers multiple options for accomplishing the necessary networking between interfaces utilizing the graphical network manager tools or the command line interface.
Since Fog server installation and local networking is complete we can now turn our attention to installing the Fog client on craft-2 and craft-3. Open a Web browser on each computer and navigate to the Fog server address — http://
Creating Client Images
In our lab we use Windows 8 on craft-2 and Windows 10 on craft-3. Since Fog supports multiple partition imaging, it’s possible to dual boot one or both client computers. Adding additional operating systems like Linux expands the analysis capabilities to additional file types like Executable and Linkable Format (ELF). Creating a Linux client image is also smart for dissecting exploit kits and running a Cuckoo instance for quick runtime metadata. Additionally, a third or fourth client computer could be added to the local network to include multiple Windows operating systems such as Windows 7 and Windows XP, both of which are still targeted operating systems.
It is beneficial to be patient when preparing PCs for image creation. You may believe the software/tool list necessary for both static and runtime malware analysis has been exhausted, but you will almost certainly forget one or two tools that will lead to the creation of an updated image. To save time, wait a few days before creating a Fog image for each client computer to ensure that the toolset is truly complete.
Obviously, historically popular exploitable applications should be included in the installation list for runtime analysis: Microsoft Office (enable macros of course), Java, Flash, Silverlight, Adobe Acrobat Reader, etc. When analyzing malicious code there are a few “must-have” resources and a lot of “nice-to-have” tools. Mark Russinovich’s Sysinternals fall into the former category. Mandatory static analysis tools include packer identifiers like PEiD (no longer supported, but a vintage piece of history), and debuggers like OllyDbg and IDA Pro. On GitHub, Rshipp curates a comprehensive tool list that is worth reviewing before building client images.
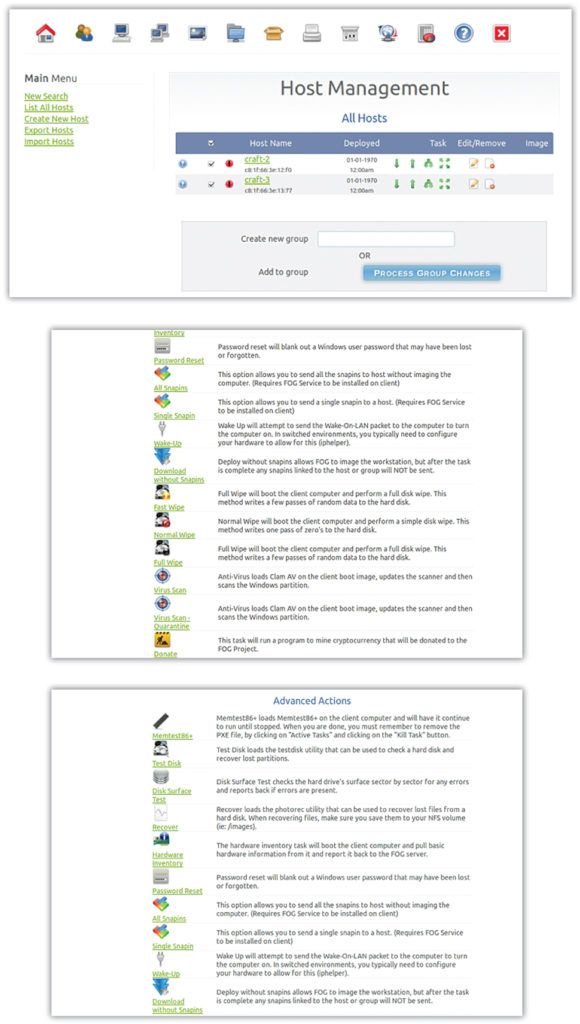
Once the client systems (craft-2 and craft-3) are complete, we use the Fog control panel on craft-1 to generate a complete image for each computer. After analyzing a specific piece of malware, it only takes a few minutes to re-image the “bare metal” from the Fog control panel. One of the benefits of using Fog is that there is an option to overwrite the master boot record (MBR), which may be necessary in specific instances and is generally a good practice for re-obtaining a clean system that is ready for the next malware sample.
The Gateway
Since craft-1 is the default gateway for all network traffic generated by craft-2 and craft-3, we want to install all necessary applications to make full packet capture parsing as efficient as possible. Doug Burks’s Security Onion is one of the easiest solutions for continuously importing known signatures on a range of network security monitoring (NSM) solutions like Snort and Bro. Security Onion has also done much of the heavy lifting, providing all of the open source dashboards like Sguil and Squert. Security Onion is acquirable via an Ubuntu ISO file, but because we already have Fog working correctly, the better option is to add the Security Onion PPA and packages to /etc/apt/sources.list. Comment out the other packages in the list to facilitate Security Onion updating without affecting the Fog dependency packages.
Moloch is another tool worth considering for installation on the gateway; and TCPdump (included in Xubuntu) should be running in the background for full PCAP storage which can be parsed in the future. Spending time reading the manual page for TCPDump will ensure PCAPs are captured in the most desirable format. For example:
Capture: _ sudo tcpdump -n -A -vvv -s0 -S -i eth0 -w capture1.pcap_
Read: _ sudo tcpdump -n -A -vvv -s0 -S -r capture1.pcap | less_ You may also want to run separate instances of TCPDump on each gateway interface (perhaps eth0 and wlan0 or eth0 and eth1, depending on the setup) to ensure a complete record and provide differences between internal and external network traffic.
OPSEC Concerns
Now that the environment is properly configured, it’s time to think about operational security. Most internet service providers (ISPs) have a difficult time differentiating between legitimate malware research traffic and victim systems on their network. Thus, it may be beneficial to create a VPN where traffic will exit to the Internet somewhere other than your residential or business ISP. In case the VPN tunnel drops during runtime analysis, it is advisable to use a completely segregated home/business network to remove all possibility of malicious code jumping to a production network.
To add another layer of network obfuscation, consider using a relatively anonymous pre-paid mobile 4G USB Stick or MiFi, or tether from an existing mobile phone. These devices (depending on the mobile phone carrier) typically employ a highly dynamic network address translation (NAT) pool which is beneficial if threat actors are blacklisting specific IP addresses or subnets from communicating with their respective C2 server. The data transfer speeds of a USB Stick or MiFi may be slower than a coaxial/fiber circuit, but for the purposes of malware research they work exceedingly well.
Some researchers prefer to restrict malware access to the Internet and instead build local services to emulate the Internet (DNS, NTP, etc.). For our purposes, connecting to an active C2 host is preferable.
Lastly, a write-block USB drive is optimal for transporting malicious code between systems to avoid contaminating cloud services and/or revealing potential personally identifiable information (PII). To ensure the USB drive is not mishandled make certain to label the drive with a noticeable caution or warning message related to the drive’s contents.
Conclusion
Creating a local malware test environment is much like approaching a desk in the morning to begin work. A large clean space with available light enables increased productivity regardless of the day’s challenges. Similarly, a properly configured segregated local network will empower security researchers and analysts with the flexibility necessary to quickly and safely dissect malicious code and obtain the resulting artifacts and behaviors in a shorter amount of time.
A “bare metal” environment bypasses many virtual restrictions and ensures that malware will properly execute at runtime. Remote sandboxes may also be useful in certain scenarios, specifically when bulk processing is required, but a local “bare metal” laboratory will ensure the proper resources are available regardless of the situation and specific malware being examined. For $1,200 USD or less, the aforementioned host/network configuration will yield a long-term scalable malware testing solution, thanks to the individuals who continue to contribute valuable open source software.
Related